|
|
|
|
|
||
|
|
|
|
|
|
|
|
|
|
Andrew
Bates examples of 3D Character Modelling, Rigging and Animation. This is a
work in progress … |
|
||
|
|
|
|
|
|
|
|
|
|
This web page is the examples section of my resume for character modelling, rigging and animation. It shows the different stages of the character animation process. This is a work in progress and the page will be updated as I complete stages. Press REFRESH if you have been to this page before as new information may be on this page. Click on the images to open the QuickTime video files. Press the back button at the top of the browser to return to this page. You will need Quicktime 5 or higher installed on your computer. You can download the latest version from www.apple.com/quicktime/download |
|
||
|
|
|
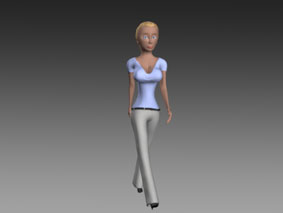
Character Modelling (click image to see turntable video) |
|||
|
|
|
|
|
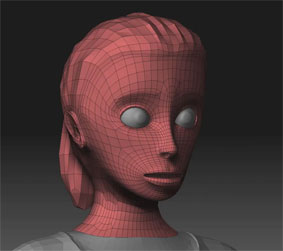
Here is an example of my 3D character model. I have created a turntable file of the model. The model has been created in Maya and ZBrush. Click on the image to see the turntable file. Notice the edge loops have been modelled correctly and the model is suitable for facial animation. The model is designed for high res close up shots and is 13,000 polys. |
|
|
|
|
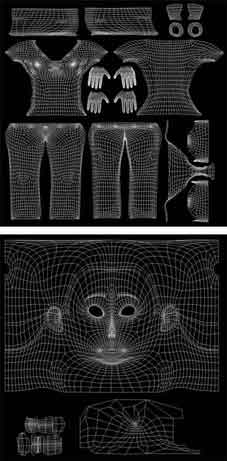
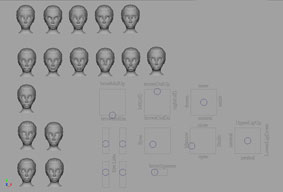
Textures and UV layout |
|
||
|
|
|
|
|
Here are the uv’s for the model. The uv’s have been created in Maya and I have laid them out in two separate regions. I have created the following maps for the model using ZBrush and Photoshop. · Colour maps · Cavity · Specular · Normal maps · Displacement maps have also been created for the model although I have not rendered them in these examples. The shading network allows for facial animation. This scene is set to render using the Maya Software Renderer. In this instance I have not used raytracing with SSS shaders although I am able to do so with Mental Ray and Renderman for Maya. |
|
|
|
|
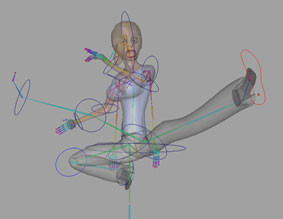
Rigging (click images to see screen captured videos) |
|
||
|
|
|
|
|
I have rigged the character with an ik/fk switch on both arms and legs, so the character is easier to animate. All body parts of the model can be controlled by selecting iconic representations and through their channel boxes. Expressions, set driven keys and the connection editor have been used in the rigging process. Click on the image to see the video file which shows the ikFk controls for the arms and legs. |
|
|
|
|
|
|
|
|
|
|
|
|
|
The facial rig is created from a combination of blend shapes and joints. The blend shapes were created in Maya and ZBrush. Iconic representation has also been created for the face so it is easier to select and animate the character. |
|
|
|
|
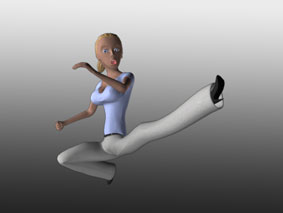
Animation (click images to see rendered videos) |
|
||||||
|
|
|
|
|
Here is the start of some basic animations. I haven’t finished skinning the character for these animations. I hope to do so in the coming weeks. A walk cycle is to the left. I have used the graph editor and hand keyed the animation for the walk. I have used the light linking method to control the lighting of the scene. |
|
||||
|
|
|
|
|
||||||
|
|
|
|
|
I have used the Maya Software Renderer to render the files. I am also familiar with Renderman for Maya. Here the character is jumping up and down. This animation was also keyed in the graph editor, motion blur has been used and After Effects is used to composite the files for the video. I will be adding animation to the face, hands, fine tuning the key poses and adding more cameras to the animation in the coming weeks. |
|
||||
|
|
|
|
|
|
|||||
|
|
|
|
|
|
|
|
|
|
|
|
|
|
Andrew
Bates |
|
|
|
||||
|
|
|
|
|
|
|||||
|
|
|
|
|
|
|||||
|
|
|
|
|
|
|
||||
|
|
|
|
|
|
|||||
|
|
|
If you have received this email by mistake
please reply to this email with unsubscribe in the subject line. |
|
||||||